Classic American Chicken Salad: The Perfect Cold Lunch Recipe

Classic American Chicken Salad Recipe | Easy Cold Lunch

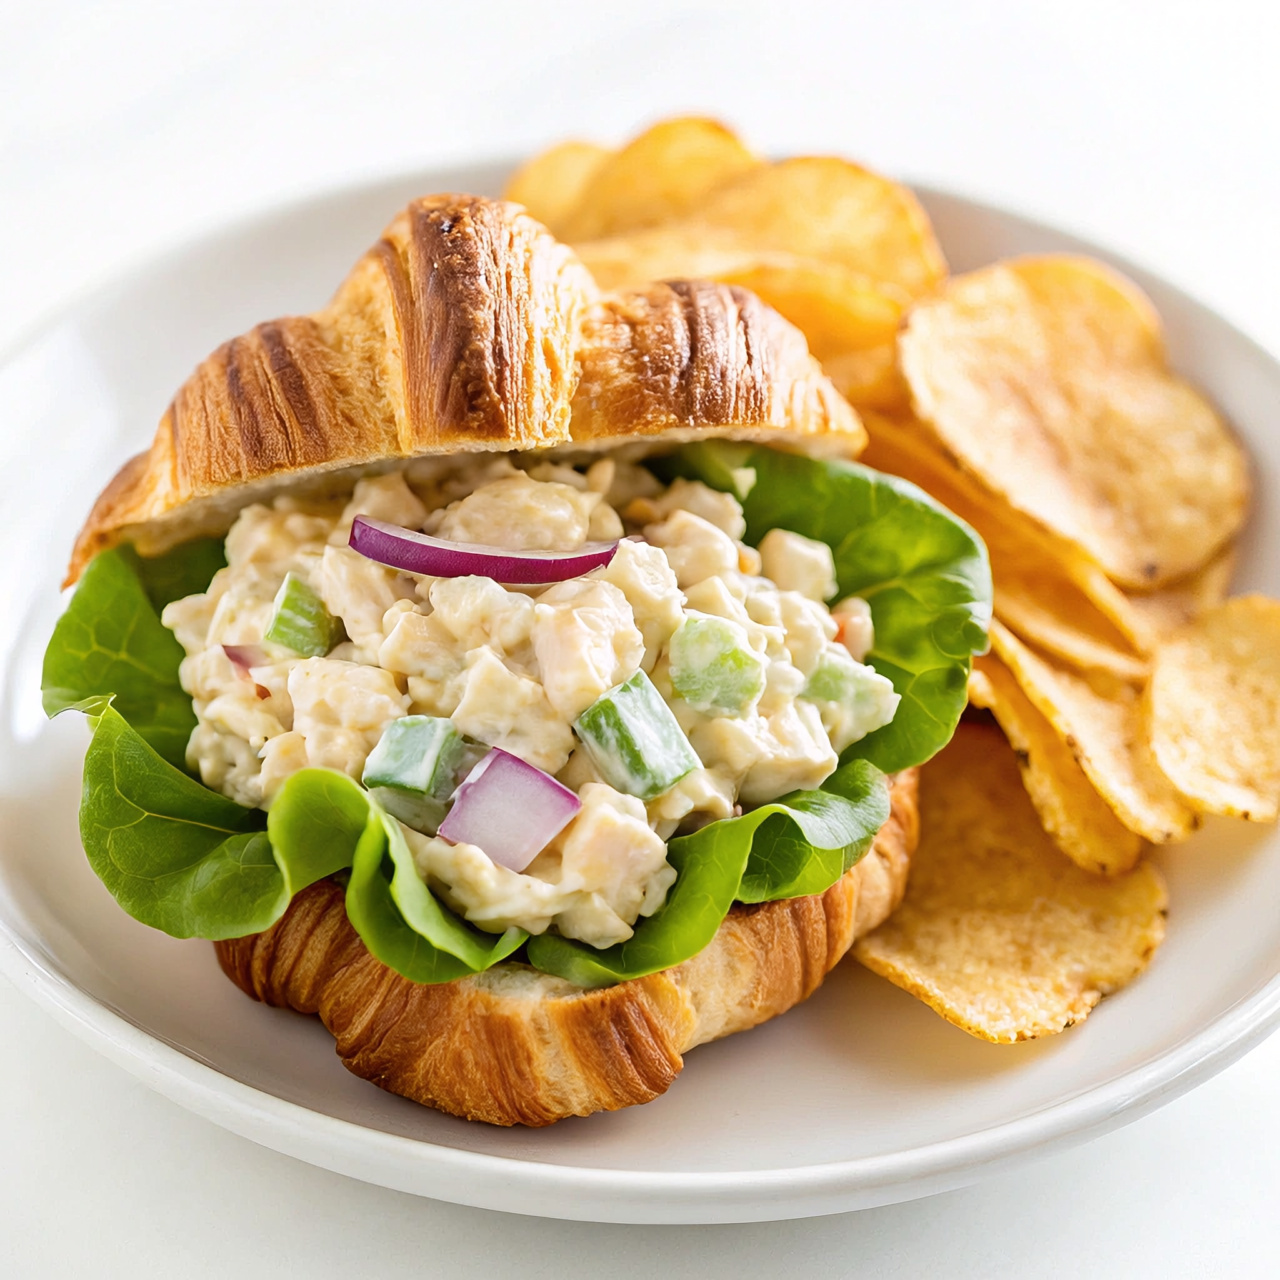
What is Chicken Salad?
American Chicken Salad is the ultimate cold lunch. It’s not a leafy green salad. It’s a creamy, savory mix of shredded chicken, mayonnaise, celery, and seasonings, served completely cold. It was invented in 1863 in Rhode Island and is now a staple at every picnic, potluck, and lunch counter in the USA. You never heat it up. The fridge is key to letting the flavors blend.

Why Everyone Loves This Cold Recipe:

  • No-Cook Option: Use store-bought rotisserie chicken and you don’t even turn on the stove.
  • Served Chilled: Tastes better after 2 hours in the fridge. Perfect make-ahead lunch.
  • Versatile: Put it on bread, croissants, crackers, or in lettuce wraps for low-carb.
  • Customizable: Add grapes, apples, nuts, or curry powder. Make it your own.

Ingredients You Need:

  • Cooked Chicken: 3 cups shredded rotisserie chicken, cold
  • Mayonnaise: 1/2 cup, full-fat for best flavor
  • Celery: 1/2 cup, finely diced for crunch
  • Red Onion: 1/4 cup, finely minced
  • Dijon Mustard: 1 teaspoon
  • Lemon Juice: 1 tablespoon, fresh
  • Salt & Black Pepper: To taste
  • Optional: 1/3 cup halved grapes or diced apple, 1/4 cup chopped pecans

Step-by-Step Instructions:

  1. Shred the Chicken: Make sure your chicken is completely cold from the fridge. Pull it apart with two forks into bite-size shreds.
  2. Mix the Dressing: In a large bowl, whisk together mayonnaise, Dijon mustard, lemon juice, salt, and pepper until smooth.
  3. Combine: Add the cold shredded chicken, diced celery, and red onion to the bowl. If using, add grapes and pecans now.
  4. Stir Gently: Fold everything together until the chicken is evenly coated. Don’t overmix or it gets mushy.
  5. Chill – The Most Important Step: Cover the bowl and refrigerate for at least 1 hour before serving. This lets the flavors meld and makes it truly a cold dish.
  6. Serve: Taste and add more salt or lemon if needed. Serve cold on toasted bread, buttery croissants, or with crackers.

Pro Tips for the Best Chicken Salad:

  • Use Cold Chicken: Warm chicken will make the mayo oily and separate.
  • Don’t Skip the Celery: The crunch is what makes it “salad” and not just chicken paste.
  • Toast the Nuts: If you add pecans or almonds, toast them first for 5 minutes. The flavor is 10x better.
  • Drain Everything: If you add grapes or apples, pat them dry. Extra water makes the salad runny.

How to Store It:
Keep in an airtight container in the refrigerator for up to 4 days. Do not freeze. Mayo separates when frozen and thawed.

Conclusion:
Classic Chicken Salad is the king of cold American lunches. It’s creamy, crunchy, and refreshing straight from the fridge. With zero cook time and endless ways to serve it, it’s the perfect recipe for hot days when you need a quick, satisfying meal.

Classic American No-Bake Cheesecake: The Ultimate Chilled Dessert

Classic American No-Bake Cheesecake Recipe | Easy Chilled Dessert

What is No-Bake Cheesecake?
No-Bake Cheesecake is a classic American chilled dessert that became popular in the 1950s. Unlike New York Cheesecake, this version doesn’t use eggs and requires no baking. You just mix, pour, and refrigerate. The fridge does all the work. It sets into a thick, creamy, sliceable texture thanks to the power of cream cheese and whipped cream. It’s the #1 most searched cold dessert in the USA every summer.

Why This Recipe is a Summer Favorite:

  • Zero Oven Required: Keep your kitchen cool. The refrigerator is the only appliance you need.
  • Only 7 Ingredients: Graham crackers, butter, cream cheese, sugar, vanilla, lemon juice, and heavy cream.
  • Foolproof: No water bath, no cracking, no sinking. If you can use a mixer, you can make this.
  • Endless Toppings: Serve it plain or top with fresh berries, cherry pie filling, or caramel sauce.

Ingredients You Need:

  • For the Crust: 2 cups graham cracker crumbs, 1/3 cup melted butter, 2 tablespoons sugar
  • For the Filling: 24 oz full-fat cream cheese, softened to room temp
  • Sugar: 1 cup powdered sugar
  • Vanilla Extract: 2 teaspoons
  • Lemon Juice: 1 tablespoon, fresh. This is the secret that helps it set.
  • Heavy Cream: 1.5 cups, cold

Step-by-Step Instructions:

  1. Make the Crust: Mix graham cracker crumbs, melted butter, and sugar. Press firmly into the bottom of a 9-inch springform pan. Refrigerate for 30 minutes to set. This is the only chilling needed for the crust.
  2. Beat the Cream Cheese: In a large bowl, beat the softened cream cheese until completely smooth and no lumps remain, about 3 minutes. Scrape the bowl.
  3. Add Sugar & Flavor: Beat in powdered sugar, vanilla, and lemon juice until combined. The lemon juice adds tang and helps the cheesecake firm up.
  4. Whip the Cream: In a separate cold bowl, beat the heavy cream to stiff peaks. This adds the air and structure.
  5. Fold Together: Gently fold the whipped cream into the cream cheese mixture with a spatula. Don’t use a mixer or you’ll deflate it. Fold until no white streaks remain.
  6. Chill – The Most Important Step: Pour the filling over the cold crust and smooth the top. Cover tightly with plastic wrap. Refrigerate for at least 6 hours, but overnight is best. The cheesecake must be completely cold to slice cleanly.

Pro Tips for a Perfect Slice:

  • Room Temp Cream Cheese: Cold cream cheese will leave lumps. Let it sit out for 2 hours.
  • Don’t Skip the Chill Time: 6 hours is the absolute minimum. If you cut it early, it will be soft and messy.
  • Use Full-Fat Dairy: Low-fat cream cheese and cream won’t set properly. This is a dessert, not a diet food.
  • Hot Knife Trick: To slice, run a large knife under hot water, wipe it dry, and cut. Clean the knife between each slice.

How to Serve It:
Serve straight from the fridge. Top each slice with fresh strawberries, blueberry compote, or hot fudge. A dollop of whipped cream makes it look bakery-worthy.

How to Store It:
Keep covered in the refrigerator for up to 5 days. You can also freeze it for 1 month. Thaw overnight in the fridge before serving.

Conclusion:
This American No-Bake Cheesecake is the definition of an easy chilled dessert. No oven, no water bath, no stress. Just 20 minutes of prep and your refrigerator handles the rest. It’s the perfect recipe to prove that the best summer desserts are served cold.

Classic French Crème Caramel: The Perfect Chilled Custard Dessert

Classic French Crème Caramel Recipe | Chilled Custard Dessert

What is Crème Caramel?
Crème Caramel, also called Flan in some countries, is a classic French chilled dessert. It’s a smooth vanilla custard baked in a caramel-lined dish, then inverted onto a plate. The magic happens in the fridge. It needs at least 6 hours of chilling to set into that perfect, wobbly, silky texture. You serve it cold, with the golden caramel sauce dripping down the sides.

Why It’s the Ultimate Make-Ahead Dessert:

  • 100% Refrigerator Required: You cannot serve this warm. Chilling overnight is mandatory for the texture.
  • Only 5 Ingredients: Eggs, milk, sugar, vanilla, and water. That’s it.
  • No Decorating Skills: The caramel sauce does all the work. You just flip it.
  • Feeds a Crowd: One batch makes 6 servings. Perfect for dinner parties.

Ingredients You Need:

  • For the Caramel: 3/4 cup granulated sugar + 1/4 cup water
  • For the Custard: 2 cups whole milk
  • Eggs: 3 large eggs + 2 large egg yolks
  • Sugar: 1/2 cup granulated sugar
  • Vanilla Extract: 2 teaspoons or 1 vanilla bean

Step-by-Step Instructions:

  1. Make the Caramel: In a saucepan, heat 3/4 cup sugar and water over medium heat. Don’t stir. Swirl the pan until it turns deep amber, about 8 minutes. Quickly pour into 6 ramekins. Tilt to coat bottoms. Set aside.
  2. Heat the Milk: Warm the milk and vanilla in a pot until steaming, not boiling. Remove from heat.
  3. Mix the Custard: In a bowl, whisk eggs, yolks, and 1/2 cup sugar for 1 minute. Slowly pour the hot milk into the eggs while whisking. This is called tempering. Strain the mixture for the smoothest texture.
  4. Bake in Water Bath: Pour custard over the set caramel in ramekins. Place ramekins in a baking dish. Pour hot water into the dish halfway up the sides. Bake at 325°F / 160°C for 35-40 minutes until edges are set but center still jiggles.
  5. Chill – This is Critical: Remove from water bath. Cool 1 hour at room temp. Then cover each ramekin and refrigerate for at least 6 hours, or overnight. The custard must be completely cold to set.
  6. Serve: Run a knife around the edge. Invert onto a cold plate. The caramel will flow down as a sauce.

Pro Tips for Success:

  • Don’t Skip the Water Bath: It makes the custard cook gently without cracks or bubbles.
  • Strain the Custard: This removes any cooked egg bits and makes it silky smooth.
  • Chill Overnight: 6 hours is minimum. 12-24 hours gives the best texture and flavor.
  • Use Cold Plates: Serving on a cold plate keeps the dessert chilled longer.

How to Store It:
Keep covered in the fridge for up to 4 days. The caramel may thin out slightly by day 3, but it still tastes amazing.

Conclusion:
Crème Caramel is the definition of a “refrigerated dessert”. The fridge does half the work for you. With no frosting and no decorating, this elegant French classic proves that chilling time is the secret ingredient to a perfect dessert.

Classic French Chocolate Mousse: The 5-Ingredient No-Bake Dessert

What is Chocolate Mousse?
Chocolate Mousse is the queen of French cold desserts. “Mousse” means foam in French, and that’s exactly what this is: a light, airy cloud of rich chocolate. It was created in France in the 18th century and became famous worldwide. Unlike pudding, real mousse has no flour or cornstarch. It gets its texture from whipped egg whites.

Why This Recipe Works for Beginners:

  • No-Bake: Perfect for hot days. Your oven stays off.
  • Only 5 Ingredients: You probably have them all in your kitchen right now.
  • One Bowl Option: You can make the whole thing with just one bowl and a whisk if you want.
  • Make-Ahead: Tastes even better after chilling overnight. Perfect for parties.

Ingredients You Need:

Step-by-Step Instructions:

  • Dark Chocolate: 6 oz high-quality dark chocolate, 70% cacao
  • Eggs: 4 large eggs, separated. Use fresh, pasteurized eggs.
  • Sugar: 1/4 cup granulated sugar
  • Salt: 1 pinch
  • Heavy Cream: 1/2 cup, cold. Optional but makes it extra creamy.
  • Vanilla Extract: 1 teaspoon, optional
  1. Melt Chocolate: Chop the chocolate and melt it gently in a bowl over simmering water or in 20-second bursts in the microwave. Let it cool slightly until just warm.
  2. Whip Yolks: In a separate bowl, whisk the egg yolks with half the sugar until pale and thick. Stir the warm melted chocolate and vanilla into the yolks.
  3. Whip Whites: In a clean bowl, beat the egg whites with salt until foamy. Slowly add the remaining sugar and beat until you have stiff, glossy peaks.
  4. Fold Gently: Take 1/3 of the egg whites and stir it into the chocolate to lighten it. Then gently fold in the remaining whites with a spatula. Stop when no white streaks remain. Don’t overmix or you’ll lose the air.
  5. Chill: Spoon into 4 serving glasses or ramekins. Cover and refrigerate for at least 4 hours, or overnight. The mousse will set into a perfect, spoonable texture.

Pro Tips for Perfect Mousse:

  • Room Temp Eggs: They whip up higher than cold eggs. Separate them cold, then let them sit 30 minutes.
  • Don’t Get Water in Chocolate: Even one drop will make it seize. Dry your bowls completely.
  • Safety Note: This recipe uses raw eggs. Use pasteurized eggs if you are serving kids, pregnant women, or elderly. Or use the egg-free version with whipped cream only.
  • Egg-Free Version: Skip eggs. Whip 1.5 cups heavy cream with 1/4 cup sugar to stiff peaks, then fold into melted chocolate.

How to Serve It:
Serve cold straight from the fridge. Top with whipped cream, fresh raspberries, chocolate shavings, or a sprinkle of sea salt.

How to Store It:
Cover and keep in the fridge for up to 3 days. Mousse does not freeze well.

Conclusion:
This French Chocolate Mousse proves that the most elegant desserts are often the simplest. No oven, no flour, no fuss. Just pure, intense chocolate flavor in a cloud-like texture. It’s the ultimate one-bowl, no-bake cold dessert for any season.

Classic French Clafoutis: The Easiest 1-Bowl Fruit Dessert

What is Clafoutis?
Clafoutis is a rustic French dessert from the Limousin region. It’s made by pouring a sweet, pancake-like batter over fresh fruit and baking it until golden. The result is a cross between a custard, a flan, and a Dutch baby. The most classic version uses black cherries, but you can use any fruit you have.

Why You’ll Love This One-Bowl Recipe:

  • One Bowl Only: Less mess, less cleanup. Mix everything in a single bowl.
  • No Special Skills: If you can whisk, you can make clafoutis. It’s impossible to mess up.
  • Versatile: Use cherries, berries, peaches, or plums. Fresh or frozen both work.
  • Elegant but Easy: Looks like it came from a Paris bakery, but takes 10 minutes to prep.

Ingredients You Need:

  • Fruit: 2 cups pitted cherries or mixed berries
  • Eggs: 3 large eggs
  • Sugar: 1/2 cup granulated sugar, plus extra for dusting
  • Flour: 1/2 cup all-purpose flour
  • Milk: 1 cup whole milk
  • Vanilla Extract: 1 teaspoon
  • Salt: 1 pinch
  • Butter: 1 tablespoon, for greasing the pan

Step-by-Step Instructions:

  1. Prep the Pan: Preheat your oven to 350°F / 175°C. Grease a 9-inch pie dish or cast iron skillet with butter.
  2. Arrange Fruit: Spread the cherries in a single layer on the bottom of the dish.
  3. Make the Batter: In one bowl, whisk the eggs and sugar for 1 minute until light. Add flour and salt, whisk until smooth. Slowly pour in the milk and vanilla, whisking until you have a thin, crepe-like batter.
  4. Bake: Pour the batter over the fruit. Bake for 35-40 minutes until puffed, golden, and a knife comes out clean.
  5. Serve: Let it cool for 10 minutes. It will deflate slightly. Dust with powdered sugar and serve warm.

Pro Tips for the Perfect Clafoutis:

  • Don’t Pit the Cherries: Traditional French recipes leave the pits in for more almond flavor. Just warn your guests!
  • Room Temp Ingredients: Eggs and milk mix better when not cold from the fridge.
  • Don’t Overbake: The center should have a slight jiggle. It sets as it cools.

How to Store It:
Cover leftovers and keep in the fridge for up to 3 days. Clafoutis tastes amazing cold for breakfast the next day.

Classic Beef Stroganoff – 30 Minute Dinner

Classic Beef Stroganoff – 30 Minute DinnerThis classic beef stroganoff is rich, creamy, and ready in 30 minutes. This beef stroganoff recipe uses tender sirloin, mushrooms, and a sour cream sauce. Perfect weeknight dinner served over egg noodles.Why This Beef Stroganoff Recipe WorksTraditional beef stroganoff takes hours, but this version is done in 30 minutes. The secret is slicing the beef thin and using a hot pan. You get the same restaurant flavor without the wait. My family calls this “fancy hamburger helper” because it’s that easy.This beef stroganoff serves 4 people and costs under $12 total. Way cheaper than takeout. It also reheats perfectly for lunch the next day.Ingredients for Beef Stroganoff- 1 lb beef sirloin, sliced thin- 8 oz mushrooms, sliced – 1 medium onion, diced- 2 cloves garlic, minced- 2 tbsp butter- 1 tbsp flour- 1 cup beef broth- 1 tbsp Worcestershire sauce- 1 tsp Dijon mustard- 3/4 cup sour cream- 12 oz egg noodles- Salt and black pepper to taste- Fresh parsley for garnishHow to Make Beef Stroganoff Step by StepStep 1: Cook egg noodles according to package directions. Drain and set aside.Step 2: Season beef with salt and pepper. Heat a large skillet over high heat. Sear beef 1 minute per side. Remove beef and set aside.Step 3: In the same pan, melt butter. Add mushrooms and onion. Cook 5 minutes until soft. Add garlic and cook 30 seconds.Step 4: Sprinkle flour over veggies. Stir 1 minute. Slowly pour in beef broth while whisking.Step 5: Add Worcestershire sauce and Dijon mustard. Simmer 3 minutes until thick.Step 6: Turn heat to low. Stir in sour cream. Add beef back to pan. Don’t boil or sauce will curdle.Step 7: Serve beef stroganoff over hot egg noodles. Garnish with parsley.Pro Tips for Perfect Beef Stroganoff1. Use sirloin or tenderloin. Don’t use stew meat – it gets tough.2. Slice beef against the grain for tenderness.3. Room temperature sour cream won’t curdle. Take it out 20 minutes before cooking.4. For extra flavor, add 1/4 cup white wine with the broth.This beef stroganoff is pure comfort food. The creamy sauce with tender beef tastes like you cooked all day. My husband requests it every month. It beats any restaurant version.Store leftovers in the fridge 3 days. Reheat gently on the stove with a splash of broth.Looking for dessert? Try my One Bowl Chocolate Cake next. It’s the perfect ending to this meal.Learn more about the history of this Russian dish on The Spruce Eats.

The Best One-Bowl Chocolate Cake – Ready in 30 Minutes

This is the best one bowl chocolate cake recipe you’ll ever try. This one bowl chocolate cake is super moist and ready in 30 minutes. No mixer needed for this easy one bowl chocolate cake.

Tired of dirtying 5 bowls for one cake? This one-bowl chocolate cake uses simple pantry ingredients. The secret to this moist one bowl chocolate cake is the vinegar.

One-Bowl Chocolate Cake

The most moist and fudgy one-bowl chocolate cake. Made in one bowl with no mixer in 30 minutes. This easy recipe is perfect for beginners.
Prep Time 10 minutes
Cook Time 20 minutes
Total Time 30 minutes
Servings: 12 slices
Course: Dessert
Cuisine: American
Calories: 350

Ingredients
  

  • 1 3/4 cups (219g) all-purpose flour
  • 1 3/4 cups (350g) granulated sugar
  • 3/4 cup (65g) unsweetened cocoa powder
  • 2 teaspoons baking soda
  • 1 teaspoon baking powder
  • 1 teaspoon salt
  • 2 large eggs, room temperature
  • 1 cup (240ml) buttermilk, room temperature
  • 1/2 cup (120ml) vegetable oil
  • 2 teaspoons pure vanilla extract
  • 1 cup (240ml) hot coffee or hot water

Method
 

  1. 1. Preheat oven to 350°F (175°C). Grease a 9×13 inch pan or two 9-inch round pans and line with parchment paper.
  2. 2. In a large bowl, whisk together the flour, sugar, cocoa powder, baking soda, baking powder, and salt.
  3. 3. Add the eggs, buttermilk, oil, and vanilla to the dry ingredients. Whisk until just combined. Do not overmix.
  4. 4. Carefully pour in the hot coffee or hot water. The batter will be very thin. This is normal. Whisk until smooth.
  5. 5. Pour the batter into the prepared pan. Bake for 18-22 minutes for round pans or 25-30 minutes for a 9×13 pan. A toothpick inserted in the center should come out with a few moist crumbs.
  6. 6. Let the cake cool in the pan for 10 minutes, then transfer to a wire rack to cool completely before frosting.

Notes

1. Hot coffee enhances the chocolate flavor. You won’t taste coffee. You can use hot water instead.
2. Buttermilk is key for a moist cake. To make your own, add 1 tablespoon of lemon juice or vinegar to 1 cup of milk. Let it sit for 5 minutes.
3. Do not overbake. The cake continues to cook as it cools. Pull it out when a toothpick has a few moist crumbs.
4. Store covered at room temperature for 3 days or in the fridge for 1 week.